
Incremental Numbering Suite
| Function Syntax | NumInc |
| Current Version | 4.2 |
| Download | NumIncV4-2.lsp |
| View HTML Version | NumIncV4-2.html |
| Compatible with AutoCAD for Mac? | No |
| Compatible with AutoCAD LT? | No |
| Donate |
Contents
Program Description
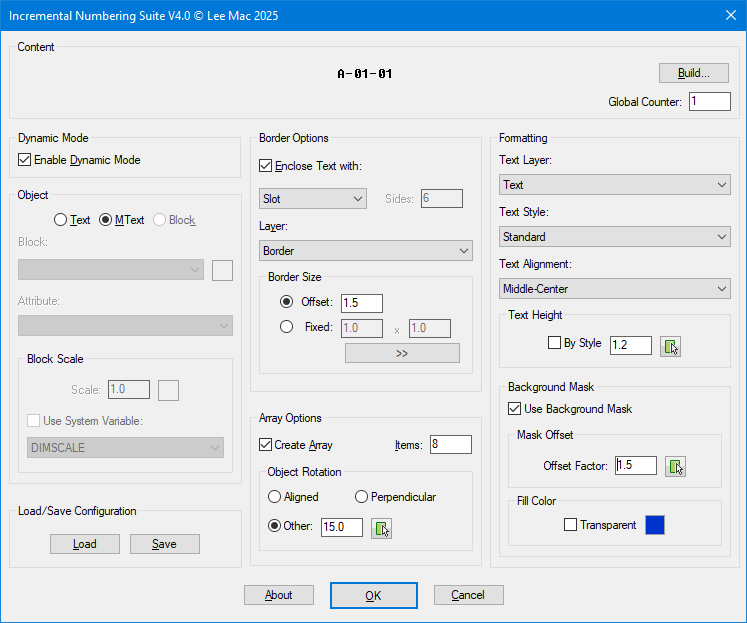
Incremental Numbering Suite enables the user to dynamically place incrementing alphabetical or numerical text in a drawing, with a range of positioning utilities.
The sequential text can be created using Text, MText or Attributed Blocks; furthermore, the style and formatting of these objects can be altered directly from the main dialog, with all settings remembered between drawing sessions.
The user can modify the Text or Block layer, choose from a list of available Text Styles in the drawing, alter the Text or MText alignment, and also change the Text Height by either entering an arbitrary value, picking a value from the drawing, or using the height defined by the selected Text Style.
If the Object type is set to use an attributed block, the user may choose the block that is to be used from a list of attribute blocks defined in the drawing, or select a block object directly from the drawing.
The user also has control over which attribute will house the incrementing string, and the scale at which the block is inserted. This scale value can take an arbitrary value entered by the user or picked from the drawing, or can be dependent upon the current value of a selected System Variable, such as DIMSCALE.
If MText is selected, the user may also toggle the use of an MText Background Mask and control both the Background Mask Offset Factor and Colour.
The user can build the incrementing content using arbitrarily many numerical, alphabetical, or alphanumerical components, with the increment amount and increment frequency controlled independently for each component. Components may use decimals and leading zeroes, and may also be static (i.e. non-incrementing).
If the user has chosen to use Text or MText objects in which to house the incremental text, there is an additional option to enclose such objects with a border. The border may be Circular, Rectangular, Slot or an n-sided Polygon; created on a layer chosen from the main dialog.
The size of the border may be controlled using an Offset Factor from the Text or MText object. The Offset Factor has behaviour identical to that of the Background Mask Offset Factor wherein the offset is dependent upon the text height: an offset factor of 1.0 exactly fits the Text or MText object, a factor of 1.5 extends the border by 0.5 times the text height etc. Alternatively, the user may specify a fixed border size, with the option to pick either dimension from the drawing.
Main Dialog Preview
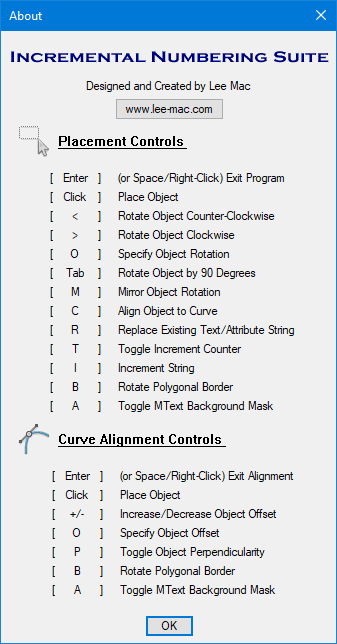
About Dialog Preview
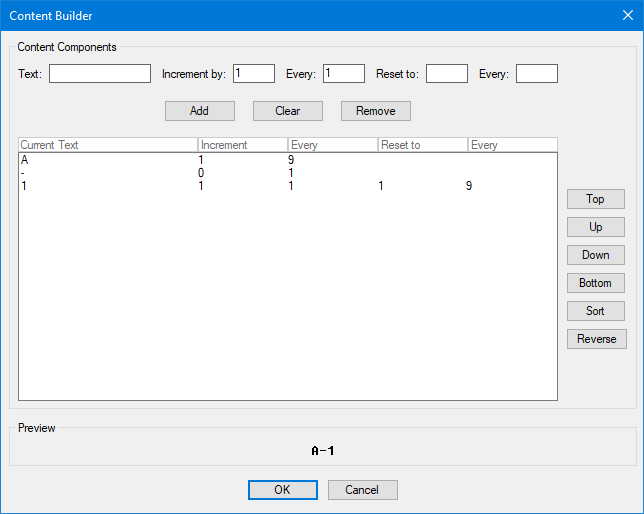
Content Builder
The program allows the user to construct the incrementing string from an arbitrary number incrementing or static components.
On clicking the 'Build' button in the top-right of the dialog, the user is presented with the 'Content Builder' dialog, through which an incrementing string can be built from any number of incrementing or static components.
At the top of the dialog, the user may specify the text content of the component, the increment amount, and the frequency of the increment. If the component should be static (i.e. non-incrementing), the user can specify an increment amount of 0 or leave both the increment amount and frequency blank.
The user may also optionally specify a reset value and reset frequency for each component. If such fields are specified, the value of the component will be set to the reset value at every multiple of the reset frequency.
The component text may be alphabetical, numerical, or alphanumerical, and may use decimals and/or leading zeroes. For numerical component text, the increment amount may be positive or negative and may also use decimal values. The increment frequency (and optional reset frequency) should be a positive non-zero integer.
The Global Counter found below the 'Build' button on the main dialog is the underlying counter governing the timing of the increments: when the global counter is a multiple of the increment frequency, the component text will be incremented by the increment amount; when the counter is a multiple of the reset frequency, the component text will be set back to the reset value.
Content Builder Preview
Loading & Saving Configurations
Program configurations may be saved to a .cfg file with arbitrary filename & location using the 'Save' button located in the lower-left of the main dialog; such files may then be subsequently loaded using the corresponding 'Load' button.
Creating an Array
The program also offers the ability for the user to array the selected object, with the content automatically incremented sequentially for each object in the array.
Upon enabling the option to 'Create Array' (located towards the base of the center panel of the dialog), the user can specify the number of items in the array and furthermore control the rotation of each object in the array, either relative to the direction of the array, or by entering a fixed value or picking such value from the drawing.
After submitting the desired dialog settings, the user is then prompted to specify a base point for the array. This is the point at which the first object in the array will be created and the point from which the array will emanate.
Following the valid specification of an array base point, the user is given the option to supply either an array spacing vector, or the array endpoint.
The array spacing vector describes the vector between each successive object in the array. Conversely, the array endpoint specifies the point at which the last object in the array will be inserted; with the remaining objects inserted equispaced between the two points.
Array Example 1
Demonstrating the difference between Spacing Vector and Endpoint specification, with Object Rotation set to 'Aligned'.

Concerning object rotation, the user has three options to determine how objects are oriented relative to the array. If the user decides to align objects in the direction of the array, the rotation of each object will reflect the direction of the array vector.
Similarly, selecting to rotate objects perpendicular to the array will result in objects oriented at right-angles to the array direction, whilst retaining readability.
Finally, the user may also specify an arbitrary fixed rotation, or pick such value directly from the drawing.
Array Example 2
Demonstrating Perpendicular rotation and a fixed zero rotation.

Dynamic Mode
Dynamic Mode is activated by enabling the option: 'Enable Dynamic Mode'. This mode will display a real-time preview of the Text, MText or Attributed Block with any border or background mask that may be specified.
Note:
As a result of the method used to display the real-time preview, Dynamic Mode restricts the use of standard AutoCAD functionality such as Object Snap, Orthomode, Tracking etc. To enable such functionality, uncheck the 'Enable Dynamic Mode' option in the top-left of the dialog.
Various positioning controls displayed at the command line:
| Dynamic Mode Placement Controls | ||
|---|---|---|
| Key | Action | |
| Enter | (or Space/Right-Click) Exit Program [Cancel] | |
| Click | Place Object | |
| < | Rotates Object Counter Clockwise | |
| > | Rotates Object Clockwise | |
| O / o | Specify Object Rotation | |
| Tab | Rotate Object by 90° | |
| M / m | Mirror Object Rotation | |
| C / c | Align Object to Curve | |
| R / r | Replace Existing Annotation Content | |
| T / t | Toggle Increment Counter | |
| I / i | Increment String | |
| B / b | Rotate Polygonal Border | |
| A / a | Toggle MText Background Mask | |
Examples of Usage
Incrementing two sections of Text with a Background Mask and Rectangular Border

Incrementing Text with Leading Zeros

Incrementing Alphabetical Text with a Slot Border

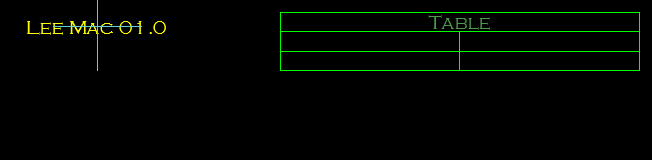
Decimal Increment with Leading Zeros & Automatic Detection of Table Cells
Incrementing Numerical Text with Leading Zeros and Hexagonal Border:

Incrementing Alphabetical Text, Demonstrating Rotation of Triangular Border

Incrementing three sections of Text at Different Rates with a Slot Border

Align Object to Curve
This functionality is very similar to that offered by my Align Text to Curve and Align Objects to Curve programs.
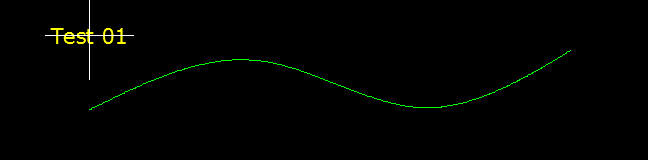
The user can choose to align the object to a selected curve object (Line, LWPolyline, Polyline, XLine, Spline, Arc, Circle, Ellipse etc.) by pressing C or c during placement.
The user is then prompted to select a curve to which the text will be aligned. The text will follow the selected curve with various positioning controls available at the command-line:
| Curve Alignment Controls | ||
|---|---|---|
| Key | Action | |
| Enter | (or Space/Right-Click) Exit Curve Alignment [Cancel] | |
| Click | Place Object | |
| + / - | Increase / Decrease Object Offset | |
| O / o | Specify Object Offset | |
| P / p | Toggle Object Perpendicularity | |
| B / b | Rotate Polygonal Border | |
| A / a | Toggle MText Background Mask | |
Replace Existing Annotation Content
Upon pressing R or r during object placement, the user may select a primary or nested text, mtext, single-line & multiline attribute, dimension, or multileader containing mtext or attributed block content.
Following a valid selection, the text content of the selected annotation object will be updated to display the incrementing string.
If the selected attributed block or multileader attributed block contains more than one attribute, the user will be prompted to specify the tag of the attribute whose value is to be replaced with the sequential text string.
The user can exit this mode and return to standard text placement by pressing Enter, Space, or by Right-clicking the mouse at the prompt.
Standard Placement Mode
This mode is available when the 'Enable Dynamic Mode' control is disabled (unticked).
When using this mode, there is no longer a real-time preview of the text at the cursor, however all standard AutoCAD functionality is available, (such as Object Snap, Tracking, Orthomode, etc.).
The majority of placement controls are still available at the command-line:
| Standard Mode Placement Controls | ||
|---|---|---|
| Key | Action | |
| Enter | (or Space/Right-Click) Exit Program [Cancel] | |
| Click | Place Object | |
| O / o | Specify Object Rotation | |
| RO | Rotate Object by 90° | |
| M / m | Mirror Object Rotation | |
| C / c | Align Object to Curve | |
| R / r | Replace Existing Annotation Content | |
| T / t | Toggle Increment Counter | |
| I / i | Increment String | |
| B / b | Rotate Polygonal Border | |
| A / a | Toggle MText Background Mask | |
Instructions for Running
Please refer to How to Run an AutoLISP Program.